|
GTO Axle Identification Overall Housing Dimensions Size for the standard
mid-year 1966 and later GTO differential is as follows: Axle flange to axle flange is 60
15/16 inches Subtract 1" from above
measurements for production mid-year 1966 and earlier No wider unit should be used, but
a narrower unit can easily be used with the bonus of using a standard wheel
offset. (A suggested GTO maximum wheel
width with standard axle is approximately 8". This means the rim
is 9" wide from outside rim to outside rim. In order to fit
properly with the stock axle, a wheel with 5" backspacing will give
4" to the outside of the rim from the mounting surface. A 2 inch
narrower axle would allow a normal rim to be used with no offset.) GETTING WIDE TIRES TO FIT: Bolt pattern is 5 on 4.75" same
as Chevy Malibu - so very common wheel. What's not so common is
the required back spacing to get the wheel centered in our wheel wells if you
plan on running fatter tires in the rear. Mid 1966 to 1972 Rear
axle is about 61" axle flange to axle flange (where brake drums butt up
against), but early 66's before about January production were only 60". The current axle needs to be measured to
verify width, because it plays an important part in determining what rim
backspacing is necessary. The later rear axle requires a wheel with
between 5" and 5-1/4" of backspacing, while the earlier axles will
only need a wheel with 4-1/2" to 4-3/4" backspacing. Next thing is to get the maximum
width out of the back wheel tubs. The inside is easy since a mallet
will smash in the inner fender sheet metal above the frame rail until it is
slightly further away from the wheel than the frame rail. Even if there
is rubbing, it will be on a totally smooth surface. Only the very
bottom metal needs to be moved over, and nothing needs to be done up higher.
Outside edge is much more work. For some reason Pontiac
decided to use a 2" wide lip on the wheel well, and about half this
lip has to be removed. After the lip is trimmed back, the only thing
the tire can touch is the smooth rolled edge of the inner wheel well about
2" above the lip. Easiest way to properly trim things back is
to start by drilling new screw holes through the stainless molding a half
inch more to the outside of the current screw holes. Drilling one
hole at a time and moving each screw will keep things in line. After
all holes have been made and the screws all fit, take off the molding
and draw a line from each of the old screw holes to the next - this will be
the cutting line for removing about 3/4" of lip. If you cut past the screw holes, there is a
very good chance that you will remove the spot welds keeping the inner fender
attached to the quarter panel. We have
done about a dozen cars cutting up to the old screw holes and never had a
problem. This process usually goes
pretty fast using a cut-off wheel, but it is terribly messy and really good
eye protection is necessary. If you
have any doubts, a body shop could handle the cutting and it should only take
an hour of shop time. The stainless
molding can then be cut between the screw holes to match the fender lip. A good pair of tin snips can be used for
this trimming. A little sanding of the
edges will prevent future cuts and snags. When the above is completed, the
width of the wheel well will go from about 10-1/2” to exactly 12” on the early GTO's, and even wider on the 1968 to 1972 models. At this point a 275/60R15 tire can be installed
using rims with the proper backspacing.
This tire mounted on an 8” rim will be approximately 11” wide, leaving
about a half inch on each side of the tire on an 8” rim. A wider rim will also make the tire
wider. Figure something like .6”
increase in width for each inch of rim width increase.
Our GTO’s came new from the factory
with a droopy rear end, and things haven’t improved over the years. A one inch spacer installed under the rear
springs will bring the car up to level ride height. A 1-1/2” spacer will provide a very mild “California
Rake” to the front. Neither spacer
will affect ride quality since it is under the spring and won’t change the
spring rate.
10 Bolt Axle Ratio Identification:
Three different differential carriers
are used. 1) 2.56 and 2.78 ratios There was also a stronger 4 pinion
spider gear carrier installed on 4-speed cars. Codes are as follows: Note "W" on the code is
for standard differential, while "Y" on the code is for locking
differential or "Posi" rear ends.
The following codes appear on the left hand axle tube approximately 2”
to the left of the brake tube holder, or about 6” to the left of the
differential case. They are about mid
height. GTO: WB or YB 2.56
(41:16)
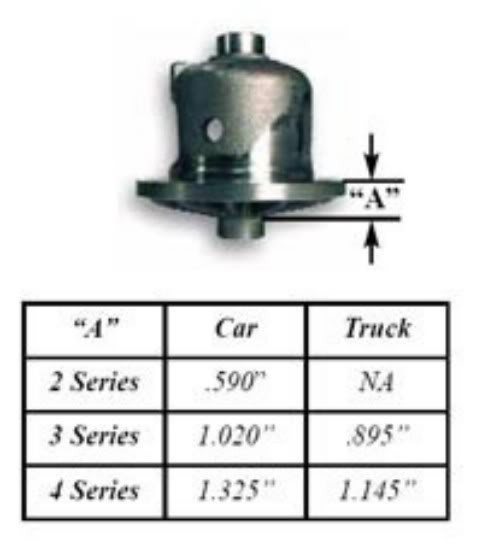
Some 12 Bolt Carrier Identification data: 12 bolt ED32088 ..............2 series......... 2.73:1 & down
Muncie transmissions: FM on Pontiac or FO on Tempest identifies
the wide ratio transmission. There are
two bands on the input shaft of a wide ratio trans. 2.52 Low FN on Pontiac or FT on Tempest
identifies a close ratio transmission.
There is only one milled band on the input shaft of a standard close
ratio trans, and no bands on a Rock Crusher. 2.20 low |
|
|
|
|